Spritesheet Scene Transitions in Unity3D
Over the past couple weeks I’ve been working on a number of transition effects for use with the Starling Framework. One of my favorites involved using a Starling MovieClip of a greyscale sprite sheet animation to hide or reveal a DisplayObject instance. For example, you could take a black and white frame sequence of something burning or a spreading ink splotch and use it to transition an image in or out. After completing the Starling work, I got to wondering if I could do the same thing in Unity3D with the same spritesheet and texture atlas assets. Of course with a little finagling it turns out I could so I thought I’d share this little tip for anyone looking to do something similar.
What It Is
Before going any further it would probably help to present a visual idea of what the heck I’m talking about. Click here for a WebGL example of the type of effect this technique can create. Just to make the example scene more interesting, I used a fantastic Blacksmith’s Forge interior from 3DForge available for free on the Unity Asset Store. So what’s happening? Essentially, there is a spritesheet animation of a spreading blob of ink being used to mix the main scene texture with a specified color (in this case just black) inside an image effect shader during Unity’s OnRenderImage event.
How It Is
Of course the first thing you’ll need to create a spritesheet transition is a spritesheet and texture atlas .xml file. I created mine with this cool little ink splotch video on YouTube and a bit of fiddling with Adobe Photoshop and Animate. You can make yours however you’d like, but you’re welcome to use what I made so long as it isn’t for commercial purposes as I have no rights to the original video posted by Gerson Domiciano Coelho.
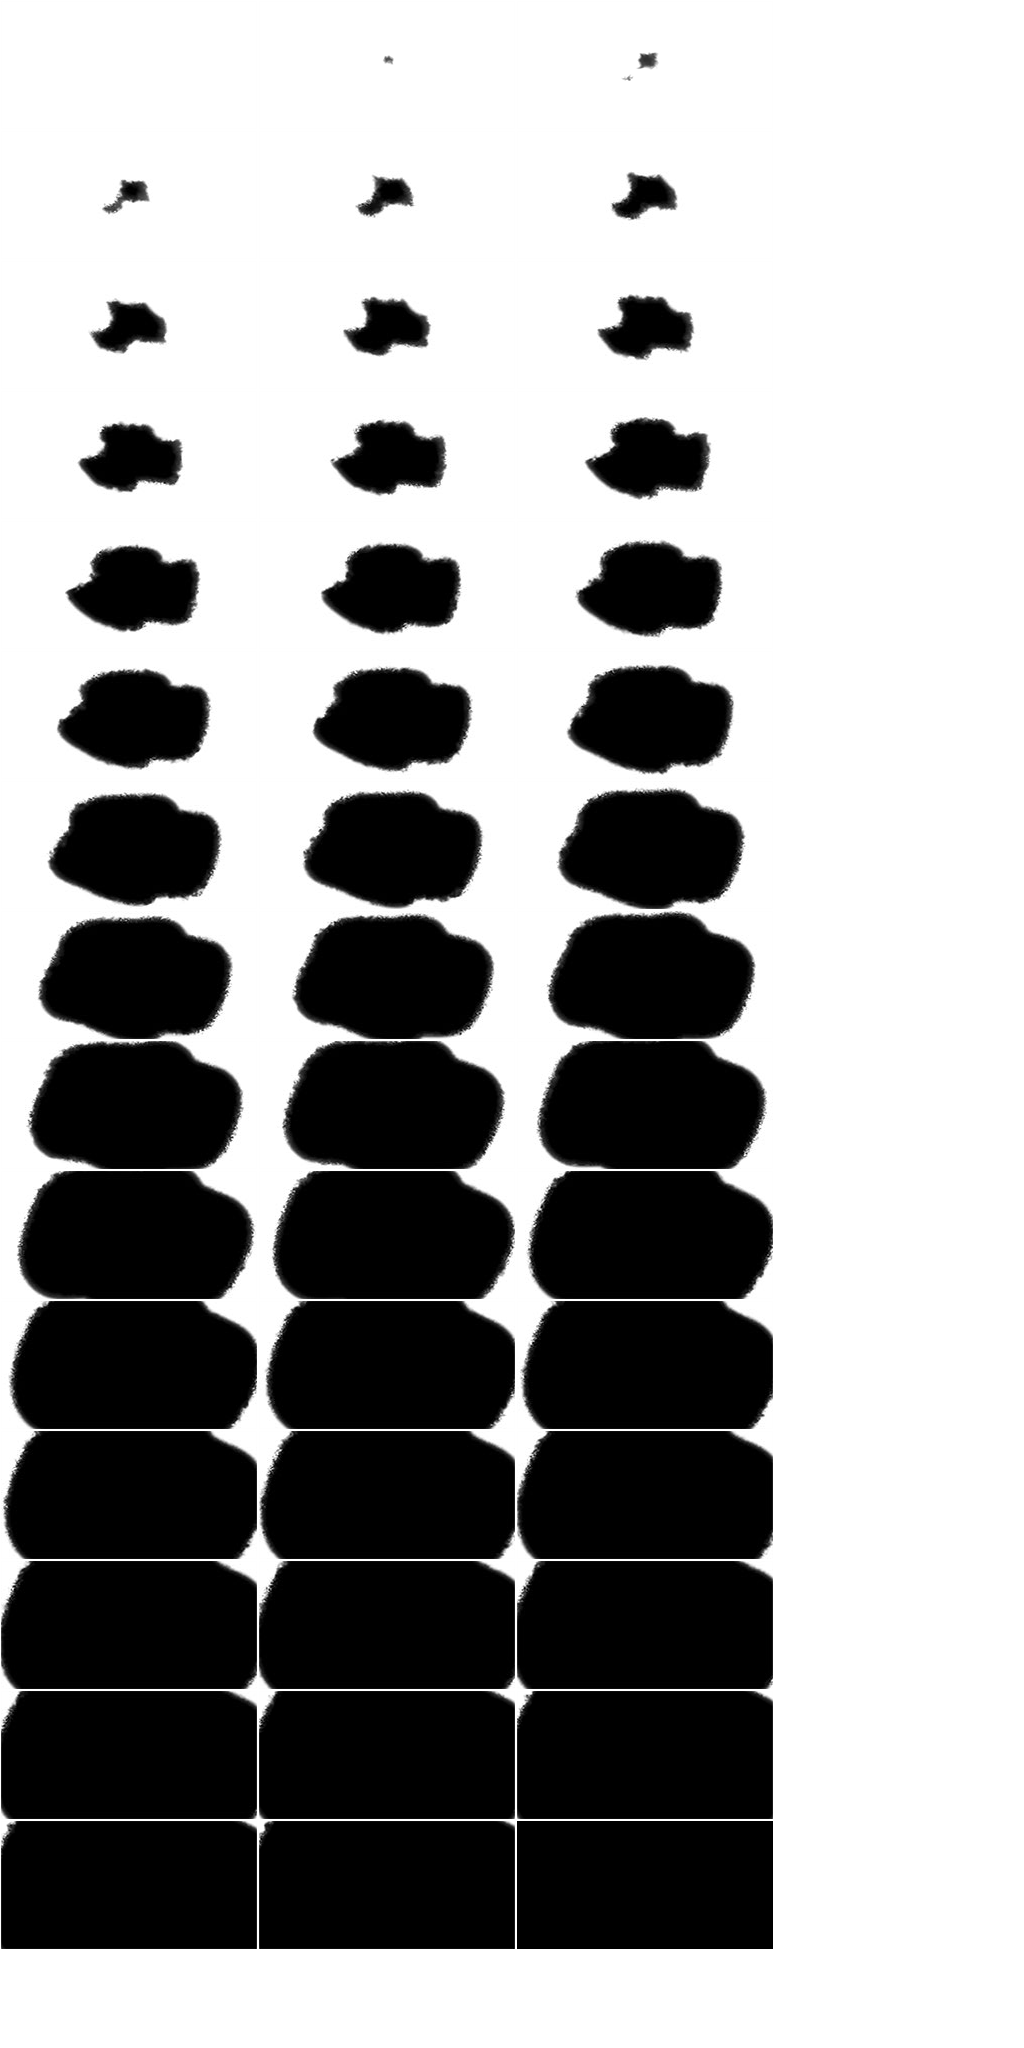
Ink Reveal Spritesheet
<?xml version="1.0" encoding="utf-8"?>
<TextureAtlas imagePath="ink_reveal.png">
<!-- Created with Adobe Animate version 15.1.1.13 -->
<!-- http://www.adobe.com/products/animate.html -->
<SubTexture name="ink_reveal0000" x="1" y="1" width="256" height="128" pivotX="0" pivotY="0"/>
<SubTexture name="ink_reveal0001" x="1" y="1" width="256" height="128"/>
<SubTexture name="ink_reveal0002" x="259" y="1" width="256" height="128"/>
<SubTexture name="ink_reveal0003" x="517" y="1" width="256" height="128"/>
<SubTexture name="ink_reveal0004" x="1" y="131" width="256" height="128"/>
<SubTexture name="ink_reveal0005" x="259" y="131" width="256" height="128"/>
<SubTexture name="ink_reveal0006" x="517" y="131" width="256" height="128"/>
<SubTexture name="ink_reveal0007" x="1" y="261" width="256" height="128"/>
<SubTexture name="ink_reveal0008" x="259" y="261" width="256" height="128"/>
<SubTexture name="ink_reveal0009" x="517" y="261" width="256" height="128"/>
<SubTexture name="ink_reveal0010" x="1" y="391" width="256" height="128"/>
<SubTexture name="ink_reveal0011" x="259" y="391" width="256" height="128"/>
<SubTexture name="ink_reveal0012" x="517" y="391" width="256" height="128"/>
<SubTexture name="ink_reveal0013" x="1" y="521" width="256" height="128"/>
<SubTexture name="ink_reveal0014" x="259" y="521" width="256" height="128"/>
<SubTexture name="ink_reveal0015" x="517" y="521" width="256" height="128"/>
<SubTexture name="ink_reveal0016" x="1" y="651" width="256" height="128"/>
<SubTexture name="ink_reveal0017" x="259" y="651" width="256" height="128"/>
<SubTexture name="ink_reveal0018" x="517" y="651" width="256" height="128"/>
<SubTexture name="ink_reveal0019" x="1" y="781" width="256" height="128"/>
<SubTexture name="ink_reveal0020" x="259" y="781" width="256" height="128"/>
<SubTexture name="ink_reveal0021" x="517" y="781" width="256" height="128"/>
<SubTexture name="ink_reveal0022" x="1" y="911" width="256" height="128"/>
<SubTexture name="ink_reveal0023" x="259" y="911" width="256" height="128"/>
<SubTexture name="ink_reveal0024" x="517" y="911" width="256" height="128"/>
<SubTexture name="ink_reveal0025" x="1" y="1041" width="256" height="128"/>
<SubTexture name="ink_reveal0026" x="259" y="1041" width="256" height="128"/>
<SubTexture name="ink_reveal0027" x="517" y="1041" width="256" height="128"/>
<SubTexture name="ink_reveal0028" x="1" y="1171" width="256" height="128"/>
<SubTexture name="ink_reveal0029" x="259" y="1171" width="256" height="128"/>
<SubTexture name="ink_reveal0030" x="517" y="1171" width="256" height="128"/>
<SubTexture name="ink_reveal0031" x="1" y="1301" width="256" height="128"/>
<SubTexture name="ink_reveal0032" x="259" y="1301" width="256" height="128"/>
<SubTexture name="ink_reveal0033" x="517" y="1301" width="256" height="128"/>
<SubTexture name="ink_reveal0034" x="1" y="1431" width="256" height="128"/>
<SubTexture name="ink_reveal0035" x="259" y="1431" width="256" height="128"/>
<SubTexture name="ink_reveal0036" x="517" y="1431" width="256" height="128"/>
<SubTexture name="ink_reveal0037" x="1" y="1561" width="256" height="128"/>
<SubTexture name="ink_reveal0038" x="259" y="1561" width="256" height="128"/>
<SubTexture name="ink_reveal0039" x="517" y="1561" width="256" height="128"/>
<SubTexture name="ink_reveal0040" x="1" y="1691" width="256" height="128"/>
<SubTexture name="ink_reveal0041" x="259" y="1691" width="256" height="128"/>
<SubTexture name="ink_reveal0042" x="517" y="1691" width="256" height="128"/>
<SubTexture name="ink_reveal0043" x="1" y="1821" width="256" height="128"/>
<SubTexture name="ink_reveal0044" x="259" y="1821" width="256" height="128"/>
<SubTexture name="ink_reveal0045" x="517" y="1821" width="256" height="128"/>
</TextureAtlas>
If you’re playing along and don’t have a Unity project set up, create one now. Just to keep things neat, add the ink_reveal.png to a Textures directory inside your Unity project Assets directory and the ink_reveal.xml to a StreamingAssets directory inside your Unity project Assets directory (as you may have guessed, we’ll be streaming that XML in a little bit later) PROTIP: set the encoding of the .xml file to ascii or 8bit – when loading text in a WebGL project, Unity tends to choke on UTF-8.
The trickiest part of this technique is the image effect shader, so let’s get that out of the way. In a Shaders directory in your Unity project, create a new Image Effect Shader and name it “SpriteSheetTransition”. In the properties section of the shader, in addition to the _MainTex property, we also want to add a _TransitionTex property which is another 2D, a _Region property which is a Vector, and a _Color property which is a, you guessed it, Color. Also add these properties to the SubShader section of the shader (down below the sampler2D _MainTex; line). In the same place, also declare a float4 property named _TransitionTex_TexelSize. Now we can get down to brass tax and write the fragment shader.
What we want to do is convert the uv coordinates passed from the vertex shader to a specific region so when we sample the transition texture (i.e. the ink_reveal.png file) we only sample the specific frame we want (i.e. a specific rectangle as described by the SubTexture elements in the texture atlas .xml file). There’s a very simple formula used to convert numerical ranges from one to another that looks like this:
NewValue = (((OldValue-OldMin) * (NewMax-NewMin)) / (OldMax-OldMin)) + NewMin
Now in uv land, where we range from 0-1, OldMax-OldMin is always 1. Likewise OldValue-OldMin will always be OldValue. So that standard formula can be simplified to something like:
transitionUV = oldUV * rangeValues + minimumValues
It’s easy enough to get our range and minimum values from our XML region values by multiplying by the texel size (_TransitionTex_TexelSize.xy is texel width and texel height. Check out the Unity docs for more details). The final thing we’ll want to do is flip the v coordinate (i.e. subtract from 1) to range from bottom to top rather than top to bottom.
Once we get that transitionUV coordinate, we can sample our transition texture there. Then we add up the rgb values of the sample and divide by 3 to get the average color (keeping in mind, this is a greyscale image). This average is what we can use for a mix amount. To reverse the effect (say for a transition out rather than a transition in), just subtract this value from 1 before mixing. In any case, now that we have our mix amount, we can just sample the main texture at the original uv coordinates and mix (lerp, that is) that color with our _Color property the amount to mix. The final shader looks something like this:
/**
*	Copyright (c) 2017 Devon O. Wolfgang
*
*	Permission is hereby granted, free of charge, to any person obtaining a copy
*	of this software and associated documentation files (the "Software"), to deal
*	in the Software without restriction, including without limitation the rights
*	to use, copy, modify, merge, publish, distribute, sublicense, and/or sell
*	copies of the Software, and to permit persons to whom the Software is
*	furnished to do so, subject to the following conditions:
*
*	The above copyright notice and this permission notice shall be included in
*	all copies or substantial portions of the Software.
*
*	THE SOFTWARE IS PROVIDED "AS IS", WITHOUT WARRANTY OF ANY KIND, EXPRESS OR
*	IMPLIED, INCLUDING BUT NOT LIMITED TO THE WARRANTIES OF MERCHANTABILITY,
*	FITNESS FOR A PARTICULAR PURPOSE AND NONINFRINGEMENT. IN NO EVENT SHALL THE
*	AUTHORS OR COPYRIGHT HOLDERS BE LIABLE FOR ANY CLAIM, DAMAGES OR OTHER
*	LIABILITY, WHETHER IN AN ACTION OF CONTRACT, TORT OR OTHERWISE, ARISING FROM,
*	OUT OF OR IN CONNECTION WITH THE SOFTWARE OR THE USE OR OTHER DEALINGS IN
*	THE SOFTWARE.
*/
Shader "Transitions/SpriteSheetTransition"
{
Properties
{
_MainTex ("Texture", 2D) = "white" {}
_TransitionTex ("Transition Texture", 2D) = "white" {}
_Region ("Region", Vector) = (1,1,1,1)
_Color ("Color", Color) = (1,1,1,1)
}
SubShader
{
// No culling or depth
Cull Off ZWrite Off ZTest Always
Pass
{
CGPROGRAM
#pragma vertex vert
#pragma fragment frag
#include "UnityCG.cginc"
struct appdata
{
float4 vertex : POSITION;
float2 uv : TEXCOORD0;
};
struct v2f
{
float2 uv : TEXCOORD0;
float4 vertex : SV_POSITION;
};
v2f vert (appdata v)
{
v2f o;
o.vertex = UnityObjectToClipPos(v.vertex);
o.uv = v.uv;
return o;
}
sampler2D _MainTex;
sampler2D _TransitionTex;
float4 _Region;
float4 _TransitionTex_TexelSize;
float4 _Color;
fixed4 frag (v2f i) : SV_Target
{
float tw = _TransitionTex_TexelSize.x;
float th = _TransitionTex_TexelSize.y;
float2 minValues = float2(0,0);
float2 rangeValues = float2(0,0);
minValues.x = _Region.x * tw;
float maxX = (_Region.x+_Region.z) * tw;
rangeValues.x = maxX - minValues.x;
minValues.y = _Region.y * th;
float maxY = (_Region.y+_Region.w) * th;
rangeValues.y = maxY - minValues.y;
float2 xUV = i.uv * rangeValues + minValues;
xUV.y = 1-xUV.y;
float4 transColor = tex2D(_TransitionTex, xUV);
float mixAmount = (transColor.x+transColor.y+transColor.z)/3;
// To invert for a transition out effect subtract mix amount from 1, like below
//mixAmount = 1-mixAmount;
float4 col = tex2D(_MainTex, i.uv);
return lerp(col, _Color, mixAmount);
}
ENDCG
}
}
}
That is really the heat of the meat as far as the effect goes, but we may as well finish up. The next thing we’ll need is a material that uses the transition shader. In a materials directory in the Unity project, create a new material named TransitionMaterial. In the Inspector, with the new material selected, set the shader to the SpriteSheetTransition.shader we just created. Also in the inspector, set the Transition Texture to the ink_reveal.png you added to the Textures directory and the Color to, well, whatever you want (black to match the effect I created).
After that, we’ll need a deserialized xml object to hold our texture atlas xml. Really this will just be a collection of objects mapped to those SubTexture elements in the xml atlas. In a Scripts directory, add a new script called RegionContainer (note that this doesn’t extend MonoBehaviour). This will both be our deserialized xml as well as a couple static methods to actually do the deserialization and return a RegionContainer instance. Something like this:
/**
*	Copyright (c) 2017 Devon O. Wolfgang
*
*	Permission is hereby granted, free of charge, to any person obtaining a copy
*	of this software and associated documentation files (the "Software"), to deal
*	in the Software without restriction, including without limitation the rights
*	to use, copy, modify, merge, publish, distribute, sublicense, and/or sell
*	copies of the Software, and to permit persons to whom the Software is
*	furnished to do so, subject to the following conditions:
*
*	The above copyright notice and this permission notice shall be included in
*	all copies or substantial portions of the Software.
*
*	THE SOFTWARE IS PROVIDED "AS IS", WITHOUT WARRANTY OF ANY KIND, EXPRESS OR
*	IMPLIED, INCLUDING BUT NOT LIMITED TO THE WARRANTIES OF MERCHANTABILITY,
*	FITNESS FOR A PARTICULAR PURPOSE AND NONINFRINGEMENT. IN NO EVENT SHALL THE
*	AUTHORS OR COPYRIGHT HOLDERS BE LIABLE FOR ANY CLAIM, DAMAGES OR OTHER
*	LIABILITY, WHETHER IN AN ACTION OF CONTRACT, TORT OR OTHERWISE, ARISING FROM,
*	OUT OF OR IN CONNECTION WITH THE SOFTWARE OR THE USE OR OTHER DEALINGS IN
*	THE SOFTWARE.
*/
using System.Xml;
using System.Xml.Serialization;
using System.Collections.Generic;
using System.IO;
[XmlRoot("TextureAtlas")]
public class RegionContainer
{
[XmlElement("SubTexture")]
public List<Region> Regions = new List<Region>();
/// <summary>
/// Deserialize xml locally from file stream
/// </summary>
public static RegionContainer Stream(string path)
{
var serializer = new XmlSerializer(typeof(RegionContainer));
using(FileStream stream = new FileStream(path, FileMode.Open))
{
return serializer.Deserialize(stream) as RegionContainer;
}
}
/// <summary>
/// Deserialize xml from loaded string
/// </summary>
public static RegionContainer Load(string text)
{
var serializer = new XmlSerializer(typeof(RegionContainer));
return serializer.Deserialize(new StringReader(text)) as RegionContainer;
}
}
public class Region
{
[XmlAttribute("name")]
public string Name{ get; set; }
[XmlAttribute("x")]
public float X { get; set; }
[XmlAttribute("y")]
public float Y { get; set; }
[XmlAttribute("width")]
public float Width { get; set; }
[XmlAttribute("height")]
public float Height { get; set; }
}
Finally we’ll need a component (i.e. a script) that actually uses that material to create the post process effect. This component will be responsible for getting our regions (deserializing the .xml file, that is), applying the effect by blitting the main scene material with our TransitionMaterial and updating the regions of the sprite sheet used in our shader. When the effect is complete, the component should just kill itself and be done.
So, back in the Scripts directory, create a new C# script named TransitionPostProcessor that looks something like this:
/**
*	Copyright (c) 2017 Devon O. Wolfgang
*
*	Permission is hereby granted, free of charge, to any person obtaining a copy
*	of this software and associated documentation files (the "Software"), to deal
*	in the Software without restriction, including without limitation the rights
*	to use, copy, modify, merge, publish, distribute, sublicense, and/or sell
*	copies of the Software, and to permit persons to whom the Software is
*	furnished to do so, subject to the following conditions:
*
*	The above copyright notice and this permission notice shall be included in
*	all copies or substantial portions of the Software.
*
*	THE SOFTWARE IS PROVIDED "AS IS", WITHOUT WARRANTY OF ANY KIND, EXPRESS OR
*	IMPLIED, INCLUDING BUT NOT LIMITED TO THE WARRANTIES OF MERCHANTABILITY,
*	FITNESS FOR A PARTICULAR PURPOSE AND NONINFRINGEMENT. IN NO EVENT SHALL THE
*	AUTHORS OR COPYRIGHT HOLDERS BE LIABLE FOR ANY CLAIM, DAMAGES OR OTHER
*	LIABILITY, WHETHER IN AN ACTION OF CONTRACT, TORT OR OTHERWISE, ARISING FROM,
*	OUT OF OR IN CONNECTION WITH THE SOFTWARE OR THE USE OR OTHER DEALINGS IN
*	THE SOFTWARE.
*/
using System.Collections;
using System.Collections.Generic;
using System.IO;
using UnityEngine;
public class TransitionPostProcessor : MonoBehaviour
{
public Material TransitionMaterial;
public float FPS;
private List<Region> Regions;
private int RegionIndex;
private float Accum;
private Vector4 CurrentRegion;
// Awake
void Awake()
{
this.RegionIndex = 0;
this.Accum = 0f;
this.CurrentRegion = new Vector4();
}
// Start
void Start()
{
StartCoroutine("GetRegions");
}
// On Render Image
void OnRenderImage(RenderTexture source, RenderTexture destination)
{
if(this.Regions==null)
return;
Graphics.Blit(source, destination, this.TransitionMaterial);
this.Accum+=Time.deltaTime;
if(this.Accum>=1f/FPS)
{
// reset the time accumulator
this.Accum=0f;
if (++this.RegionIndex==this.Regions.Count)
{
// If we've reached the end of the sprite sheet animation, remove this component from the Camera and exit
Destroy(this);
return;
}
UpdateMaterial();
}
}
// Get list of regions from texture atlas xml
private IEnumerator GetRegions()
{
string path = Path.Combine(Application.streamingAssetsPath, "ink_reveal.xml");
if(path.Contains("://"))
{
// If in browser, load xml file with WWW
// see https://docs.unity3d.com/ScriptReference/Application-streamingAssetsPath.html
var www = new WWW(path);
yield return www;
this.Regions = RegionContainer.Load(www.text).Regions;
UpdateMaterial();
}
else
{
// Otherwise stream from local file
this.Regions = RegionContainer.Stream(path).Regions;
UpdateMaterial();
}
}
/// <summary>
/// Update material with current texture atlas region
/// </summary>
private void UpdateMaterial()
{
Region r = this.Regions[this.RegionIndex];
this.CurrentRegion.Set(r.X, r.Y, r.Width, r.Height);
this.TransitionMaterial.SetVector("_Region", this.CurrentRegion);
}
}
To finally tie everything together, we’ll need one last puzzle piece – a simple script that adds the above component to the main camera. In the unity scene, create an empty GameObject named TransitionController and in the Scripts directory create a new C# script with the same name. The script itself is very simple and really just intended as a demo (I’m sure you’d never want to just keep adding a transition on mouse click. I hope.). This script then just adds the transition component to the camera on awake – and again every time you click on the scene.
/**
*	Copyright (c) 2017 Devon O. Wolfgang
*
*	Permission is hereby granted, free of charge, to any person obtaining a copy
*	of this software and associated documentation files (the "Software"), to deal
*	in the Software without restriction, including without limitation the rights
*	to use, copy, modify, merge, publish, distribute, sublicense, and/or sell
*	copies of the Software, and to permit persons to whom the Software is
*	furnished to do so, subject to the following conditions:
*
*	The above copyright notice and this permission notice shall be included in
*	all copies or substantial portions of the Software.
*
*	THE SOFTWARE IS PROVIDED "AS IS", WITHOUT WARRANTY OF ANY KIND, EXPRESS OR
*	IMPLIED, INCLUDING BUT NOT LIMITED TO THE WARRANTIES OF MERCHANTABILITY,
*	FITNESS FOR A PARTICULAR PURPOSE AND NONINFRINGEMENT. IN NO EVENT SHALL THE
*	AUTHORS OR COPYRIGHT HOLDERS BE LIABLE FOR ANY CLAIM, DAMAGES OR OTHER
*	LIABILITY, WHETHER IN AN ACTION OF CONTRACT, TORT OR OTHERWISE, ARISING FROM,
*	OUT OF OR IN CONNECTION WITH THE SOFTWARE OR THE USE OR OTHER DEALINGS IN
*	THE SOFTWARE.
*/
using UnityEngine;
public class TransitionController : MonoBehaviour
{
public Material TransitionMaterial;
private Camera MainCamera;
// Awake
void Awake()
{
this.MainCamera = Camera.main;
AddTransitionToCamera();
}
// Update
void Update()
{
if(Input.GetMouseButton(0))
{
AddTransitionToCamera();
}
}
/// <summary>
/// Adds transition effect to the main camera
/// </summary>
private void AddTransitionToCamera()
{
TransitionPostProcessor tpp = MainCamera.gameObject.GetComponent<TransitionPostProcessor>();
// Don't keep adding the component if users get click happy
if(tpp!=null)
Destroy(tpp);
tpp = MainCamera.gameObject.AddComponent<TransitionPostProcessor>();
tpp.FPS = 60;
tpp.TransitionMaterial = this.TransitionMaterial;
}
}
Add the TransitionController.cs script to the TransitionController game object in the scene and in the inspector window, set the Transition Material property to the TransitionMaterial we created earlier.
And that should be that. Test the project and see what happens. In theory, the TransitionController will add the TransitionPostProcessor component to the main camera. The processor will, in turn, load or stream the texture atlas .xml file and deserialize it into a list of Region objects. Once that list is created, the processor will blit the transition material and update the region rectangle in the shader according to a specified FPS (well, I didn’t mention that, but have a look through the posted code). When the last region has been reached, the component will simply remove itself from the camera and the scene is good to go.
It probably seems more complicated than it needs to be but really, this technique can be easily used to produce a pretty much endless number of fairly extravagant scene transitions. And if you already have the assets handy from Starling (or another spritesheet/texture atlas based framework), all the better.
If you have any problems or questions, let me know in the comments.
Post a comment